Wednesday, December 31, 2014

Final Frozen Forage of 2014

Gillian bundled up and foraging on December 31, 2014

I was chatting with a friend this morning and kind of whining about how cold it was outside (upper 20's) and how boring the winter is here in Connecticut. We won't have any fresh greens, fruit, or mushrooms for months I lamented. She was kind enough to point out there is no snow on the ground and we could still go outside for a short walk and maybe find some rosehips or other hearty wild foods. Great idea, thanks Stephanie.


We bundled up and put on multiple layers before heading out to the cranberry bog for a peek. It has only been cold for a few days, but the rain that fell last week in the field had frozen into sheets of ice, making it lots of fun to slip around. There are still plenty of cranberries (Vaccinium macrocarpon) left in the field, and we snacked on some while picking a small container of berries to bring home. Gillian had the most fun, finding the ice crystals that formed on the grasses stunning, and the air pockets under the ice cool to break open while popping frozen cranberries into her mouth. The cold mellowed out the tartness quite a bit, and they were softened by being frozen. Robert made a ginger-cranberry syrup with the soft berries, and I cooked the rest up into a traditional cranberry sauce to eat with pancakes for breakfast.


Moving on down the path through the surrounding bog, we marveled at the frozen pools of water and the sphagnum moss trapped under the ice in pristine condition. The sun was shining and reflecting off the sheets of ice, and it looked slightly unreal.


Further into the forest, we encountered plenty of pines and mixed spruce trees mixed in with oaks and birches. The needles of the white pine (Pinus strobus) can be made into a bracing, pine-scented tisane that contains vitamin C and tastes really good mixed with plenty of honey.

Wintergreen leaves and berry
 
 
Partridgeberries
Pine forests are preferred habitats for two more hearty plants to forage in winter, wintergreen (Gaultheria procumbens) and partridgeberries (Mitchella repens). Both of the evergreen plants had their edible berries present. While the partridgeberries growing from the non-edible, prostrate foliage are mostly tasteless, we picked a few to add color to a rice and grain salad for lunch. The leathery leaves and red, crowned berries of wintergreen both have the minty, wintergreen flavor, and we plucked some of both to make into a refreshing, warm tisane.

As for the fungi, we spotted the usual suspects on dead wood, crusts and polypore shelves. These mushroooms are just doing their job of breaking down the wood and decomposing the dead wood into sawdust and back into soil. Last week we came across some stunning blue turkey tails (Trametes versicolor) on another walk. Turkey tails come in many color combinations from oranges, browns, tans, greys, and sometimes subtle shades of blues. I was very surprised to find one poor, frozen, blackened-with-age gilled mushroom. I am not sure what it was, but it was my last fungi find for the year of 2014.


Sunday, November 23, 2014

Chestnut Recipe-Chestnut Mousse


In our area of Connecticut we can find many Chinese chestnut (Castanea mollissima) trees on old farmsteads and in a few parks. They don't make good landscaping trees because of the spiny hulls that drop to the ground, and I have found sources of nuts by asking on Freecycle and offering to help clean up a person's yard in exchange for the nuts. The native North American chestnuts had been mostly wiped out by a fungal blight, although there are groups working to hybridize them and make them resistant to the blight. An estimated 3 billion chestnuts trees died from the blight introduced in the early 1900's. We find the Chinese chestnuts have good flavor, even better than the imported Italian chestnuts we can buy at the grocery store, but supposedly not as good as our native chestnuts.


This year was mostly a bust for most nuts, including black walnuts, white oak acorns, and hickory nuts, but we did mange to find a good amount of chestnuts to eat. Gillian likes them boiled and peeled, and we sometimes have a hard time getting her to stop eating them all before we can cook with them! I add them to rice pilaf and made a squash-chestnut soup with wild maitake mushrooms, but this dessert mousse is our favorite. Most of our boiled and peeled chestnuts are portioned out in the freezer, ready to thaw and make mousse later in the year.

Chestnut Mousse           makes about 12 1/2 cup servings

10 oz. peeled chestnuts
1 c. milk
3 Tbsp. spiced rum
1 whole egg
1 egg yolk
1/2 c. sugar
1/3 c. water
1 Tbsp. spiced rum
2/3 c. heavy cream

1. Place the chestnuts in a small saucepan with the milk and 3 Tbsp. spiced rum. Simmer for 20 minutes, until the chestnuts soften and the milk reduces. Puree the chestnuts and milk in a food processor until smooth, and cool. It will be quite thick.

2. In a mixer bowl, combine the whole egg and the egg yolk, whip on high until thick and frothy, about 6 minutes.

3. In another small saucepan, combine the sugar and water and bring up to a boil. Cook until it reaches 235 degrees, or soft ball stage. Pour the hot sugar into the egg and whip on high until cooled, about 8 minutes. It will be thick and light yellow.

4. Whip the heavy cream to stiff peaks.

5. In a large bowl, whisk the final 1 Tbsp. of spiced rum into the chestnut puree. Pour half of the egg/sugar mixture into the chestnut puree and whisk it together until smooth. Add the remaining egg/sugar mix and whisk until completely smooth. Gently fold in the whipped heavy cream, mixing until no white streaks remain. Pipe into serving glasses, or into a cake lined mold and chill. The mousse will thicken and become firm as it chills. Serve with cranberry sauce or shaved chocolate.

Chestnut trees in flower in spring


Wednesday, October 1, 2014

Public Event!

Sunday, October 5 | 3 - 5 PM | Sugar House
What are those weird things that pop up in the woods after the rain? Are you mystified by wild mushrooms? Curious? Scared? Or do they make you hungry?

Come to Flanders Nature Center in Woodbury, CT join a foraging family who hunt, photograph, identify, and love to eat the fungi in New England for a discussion and walk identifying mushrooms (appropriate for beginners). Dispel myths, learn how to safely identify mushrooms, and discuss mycophagy, the cooking and eating of wild mushrooms.

The 3 Foragers are a family from southeast Connecticut and members of Connecticut Valley Mycological Society, Connecticut-Westchester Mycological Association, and the North American Mycological Association, as well as avid wild food foragers.
Location: The Sugar House, located ¼ mile up Church Hill Road 

Pre-registration is required.

The Program fee is: $10 members and $15 non-members
or 
Please call (203) 263-3711 x 12


Flanders Nature Center & Land Trust | 5 Church Hill Road | Woodbury, CT 06798 | 203-263-3711

Thursday, August 21, 2014

Making Bayberry Candles


Last summer Gillian went off to Colonial Survivor summer Camp at the Connecticut River Museum and had a great time building stone walls, tending the chickens, erecting a post and beam structure, and dying textiles with plants they collected on site. One thing they did not try was making bayberry candles from real bayberries. Bayberry candles were made by the colonists because they were cleaner burning and better scented than the candles made from tallow, or animal fat. Colonist folklore states that if you light a new bayberry candle on Christmas Eve or New Year's, you’ll have health, wealth and prosperity in the coming year. The adage reads: A bayberry candle burnt to the socket brings food to the larder and gold to the pocket.


In Connecticut, we have the northern bayberry, Myrica pensylvanica. It is not ideal for wax extraction, as it produces much less than the southern bayberry, but it's what I have to work with. The bushes are dioecious, meaning there needs to be male bushes to pollinate and set the fruit on the female bushes.They are a dense-branching deciduous shrub, native to North America where it is primarily found growing along the eastern coast (including seashore) from Newfoundland to North Carolina. We often find them used in landscaping applications in parking lots because they form attractive thickets and hedges. The blue-grey berries are clustered along the branches where the flowers were pollinated. We also gather the mildly fragrant leaves to press dry and use as a substitute to commercial bay leaves; we use more bayberry leaves in a recipe as their flavor is not as strong as commercial bay leaves.


On a recent trip over to Long Island, we were picking beach plums and I noticed the bayberries seemed especially abundant, and I gathered a gallon of them to take home. My hands were coated with their wax and fragrance for the rest of the day, as I just grabbed the clusters of berries and pulled them into a bucket.


It takes about 15 pounds of bayberries to render 1 pound of wax, so I knew I would not get too much wax from my one gallon. I shook the berries in a mesh sieve to get some of the smaller debris out, then placed them in a large pot with some water. I brought the pot up to a boil, and then simmered the berries for 15 minutes. The berries and most of the sticks and stems will sink, while the wax will float up to the surface of the water. I then ladled and strained the hot wax through an old jelly bag to remove more of the debris and dirt. I let the wax and some of the hot water cool in a plastic container, where the wax floated to the top and hardened. The wax block was easy to pop out and dry off, and there was about 1/3 cup of fragrant, green wax. Off to the craft store, where I purchased some votive molds, wicks, and unscented candle wax to mix with the bayberry wax. The bayberry wax is a bit weak and prone to discoloration and warping over time, so I chose to make  short votives and fortify the wax with plain wax. With my little bit of bayberry wax mixed with plain wax, I managed to pour three candles which we will burn on Christmas Eve into Christmas Day day for abundance and blessings, and for the memories of a summer day on Long Island gathering bayberries in the sun.

Wednesday, August 6, 2014

Edible Milky Mushrooms In Connecticut

The foray table, loaded with mushrooms for the ID session

Weekly forays with Connecticut Valley Mycological Society have us out in many locations throughout the state of Connecticut looking for fungi. We particularly like the edibles (of course!), but most of the mushrooms that come back to the identification table are not edible, some will make you sick, and a few can kill you, and those are definitely the ones you want to learn and avoid.

Lactarius volemus, close and creamy-white gills, mildly fishy smell, large volume of white milk

Lactarius hygrophoroides, wider
spaced gills and white milk
Initially, the weirder mushrooms we would find are in the genus Lactarius, and they can produce a milky latex-like substance when cut, scratched, or injured. Sometimes the milk is white, other times it is yellow, or can stain to red or blue. Kind of freaky, right? It turns out that some of those milky mushrooms are excellent edibles, and we collect them to take home. We collect three species for eating: Lactarius volemus, Lactarius hygrophoroides, and Lactarius corrugis. There are a few other edible Lactarius, but these three are species we can find in abundance in the summer in New England. When pan fried with a bit of oil or butter, they manage to retain a nice textural crunch. The L. volemus and L. corrugis have an unusual fishy odor when fresh, a key identifying characteristic, and some people think the odor carries over to the flavor; I find them to be an excellent edible, with an iron-y quality that doesn't have the fishy taste.

Gillian with an exceptionally nice specimen of Lactarius corrugis, showing its darker cap color

We love Connie!
Brined Lactarius and milkweed filling


Another benefit of being with CVMS is the collective knowledge of other
members when it comes to cooking, eating, or preserving the fungi. One club member, Connie, told Robert about salt-brining the Lactarius mushrooms for long term storage, a technique he now uses every year. We can sometimes find more than a dozen large, bug-free specimens on a foray day to bring home and begin the brining process. Robert begins by cleaning the Lactarius gently, then cutting them into quarters. He boils them about 10 minutes, lets them cool, then drains the cooking water. Sometimes we don't collect enough for a full jar, so he stores the cooked mushrooms in salted water in the fridge until we can collect enough for the brining process. Once we have enough, he layers them in a non-reactive glass jar, adding a few spices like garlic, peppercorns, or onions between layers, and salts each layer liberally before adding more cooked mushrooms. He allows the jar to sit a day or so, to see how much more liquid the mushrooms will exude under the salt, then adds enough clean water to cover the mushrooms entirely. They then can be stored in a cool place until we need them, and he has successfully stored them in this manner for about one year without mold forming. To use the preserved mushrooms, we remove them from the salt brine, rinse them, and soak them in fresh water overnight. They are then ready to be used in recipes, like Mushroom Paprikas, or I used them mixed with milkweed flower buds and ramps bulbs as a stuffing for steamed buns for a CVMS potluck picnic.

Lactarius corrugis, showing darker corrugated caps, darker tan-colored gills, and white milk

Becoming familiar with an edible mushroom that can produce a crazy and weird milk-like substance really opened our minds to the culinary possibilities of fungi in general. Previously, I was terrified of wild mushrooms, a real mycophobe, and it was my insistence that we learn mushrooms from people and not books that led us to CVMS and its wonderful members. I cannot stress enough how important it is to seek out and find wild food mentors to teach you the hands-on knowledge that can't be gained from a guide book, whether plants, fungi, or other foraging skills. While we are still not comfortable teaching in a commercial manner yet, we are always interested in learning and are willing and able to pay dues and for classes to further our education and experiences. Forage on!

Sunday, August 3, 2014

Black Fungi of Summer


Black trumpets (Craterellus cornucopiodes), also known as the trompette de la morte, the trumpet of death. They are actually quite delicious.

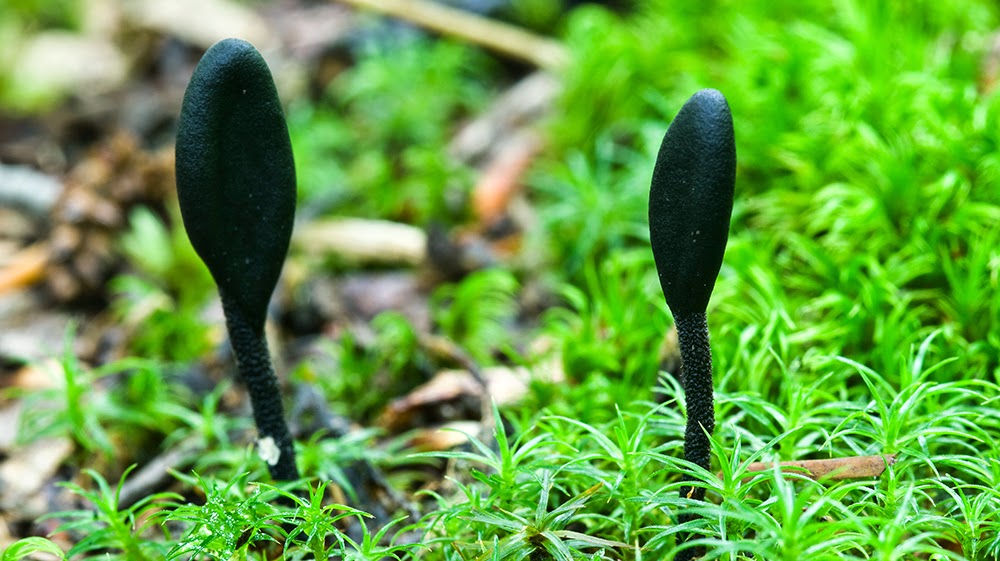
There are so many colors of summer for which we forage; deep green leaves, blueberries, red wineberries, orange daylily flowers, light green milkweed pods, yellow dandelions. Hunting for fungi, we see red and green Russulas, bright yellow Hygrocybe, purple Clavaria zollengeri, and plenty of little brown mushrooms. It's the absence of color that is often the most striking, the black hole on the forest floor, that stops us in our tracks. While not all  are edible, they are certainly beautiful.

Inocybe taquamenonensis, they love a wet area with moss and skunk cabbage nearby
Bulgaria inquinans, black and squishy

Resupinatus applicatus, these are only 3-8 mm wide

Inonotus obliquus, chaga, the tinder fungi

Strobilimyces bolete, Old Man of the Woods
Geoglossum species, Ascomycota, black earth tongues


Tylopilus alboater, the black velvet bolete, a dense and delicious bolete that is often blissfully bug-free

Another gorgeous black trumpet

Friday, July 25, 2014

This is Not a Chicken Mushroom


This IS a chicken
One of our favorite wild mushrooms to hunt and eat is the Chicken Mushroom (if yellow pored, Laetiporus sulphureus, if white pored, Laetiporus cincinnatus). When harvested at the right stage of maturity, it has excellent texture and flavor, very similar to actual chicken. For a family of 2/3 vegetarians, like we are, it makes an awesome meat-replacer in many recipes like pot pies, tacos, in garlic sauce, and skewered. We actively search it out starting in the spring, all the way through the summer and into the autumn.

The yellow pored variety (Laetiporus sulphureus) causes brown heart rot in standing or fallen  hardwoods, so it often grows above ground or along a fallen log. Its wild yellow and orange colors are easy to spot at a distance, and the fruiting is often enormous, giving us enough for dinner for a few nights, some extra to freeze, and sometimes enough to make sausages with. They are real show-stealers at public events, when we talk about how delicious and versatile they are as food.

Gillian holding a white chicken, Laetiporus cincinnatus, this IS a chicken

The white pored variety (Laetiporus cincinnatus) causes butt or root rot of hardwoods, often oaks, so is found at the base of the tree. or not far from the tree growing from the underground roots. White chickens are seemingly more tender than the yellow ones, but we don't seem to encounter them as often. Many people claim they taste better than the yellow pored chickens, but we are equally happy to find either.

Personally it drives me a little batty when I hear people refer to them as chicken "of the woods". We already have Hen of the Woods (AKA maitake or Grifola frondosa),  and not everything we find in the wild is referred to as "of the woods". I don't hunt "chanterelles of the woods" or "porcini of the woods". Some people on Facebook groups are proposing we call the white chicken "Crab of the Woods" to differentiate it from the yellow pored variety, and I will not do it. Just because I do find it in the woods, it is not of the woods, and I have run into people at public events who have a misconception that anything titled "of the woods" means it is a choice edible.

NOT A CHICKEN, Black Staining Polypore, Meripilus sumstenei

Which brings us to the topic of this whole post, the black staining polypore, which some want to refer to as "Rooster of the Woods". Its correct name is Meripilus sumstenei and it closely resembles the European Meripilus giganteus; some older guidebooks use the European name mistakenly. Like its more-correct common name (which are just terrible to use due to regional misunderstandings and not official or scientific at all, but good when speaking to the public who can't handle the binomials) describes, it often stains black with handling and has many pores (polypore) on the undersides of the  fronds. Older specimens won't blacken as much or as quickly as younger, fresher ones. They grow as overlapping fronds coming from wood, sometimes from buried roots that are not immediately visible. They can be very pretty to see, and are often surprisingly bug-free.

NOT A CHICKEN, A big Meripilus sumstenei

Are they edible? Technically, yes. You will want to try it if you have a really young one, although it will blacken to an unappetizing degree while cooking. One mushroom club member has recommended grinding it and using it in a mushroom loaf application. I say I'll wait until I find something better. As it ages, it gets really fibrous and stringy and I can only imagine it will taste like eating a piece of shredded fabric. Their size also makes you want to eat it, because it would potentially feed a family for weeks!

Still NOT A CHICKEN, a baby Meripilus sumstenei looking deceptively orange

Gillian and a Berkeleys

At this time of year, mid-summer, we start seeing them proliferate. Hiking through the woods in search of choice edibles, we catch sight of the behemoths from the corners of our eyes and initially gasp with delight, for their overall shape resembles a chicken or maitake, but then logic takes over when we realize the color is wrong for a chicken and the season is too early for a maitake. You might even think you found a Berkeleys polypore (Bondarzewia berkleyi), which is another marginal edible, but the Berkeleys doesn't stain and is much less fibrous. Facebook mushroom ID pages are littered with posts asking if these are "Chicken of the Woods" and filled with people desperate to eat them. Even the identification tables at CVMS forays are heavy with the weight of black stainers found on site and brought from afar from our newest members who think they found chickens. Sorry to disappoint, but it's just another Meripilus. But never give up, because the odds are in your favor that by putting in all those miles and hours scouring the woods will eventually yield to you a real chicken, not the lesser pretenders.

Tuesday, July 22, 2014

Connecticut Boletes


July 2014, all found in one park in one hour
July and August are prime season for finding Boletes in our area of New England. CVMS holds a well attended educational day at the end of August in a local park, and the stars of the show are usually the collections of Boletes. Robert had chosen to study them, and works to identify finds using visual observations, smell, chemical tests, and his books. His favorite way to get to know the large amount of Bolete species in our area includes photographing them.

July is under way, so he'll be out in the field (and forest), looking for the edible, and inedible, beautiful, and sometimes confusing Boletes for the next two months. Wish him luck!

Xanthoconium affine

 
Likely an Strobilomyces that has been attacked by a Hypomyces


Tuesday, June 17, 2014

Wintergreen Recipe- Wintergreen Meringues


Wintergreen (Gaultheria procumbens) is a lovely little perennial, ground hugging plant in our area. The leaves are leathery, but can be chewed while hiking for a refreshing wintergreen flavor. The red berries, also tasting of wintergreen, are abundant in the fall, and can over-winter into spring for gathering. We had a wild foods potluck to attend in June, so we went out to find some of last fall's berries, still clinging to the low foliage. I chopped them finely in the food processor. The berries are not juicy, they are rather dry inside with many seeds, which is why they can last under snowfall all winter. Once chopped, they made a paste, which I folded into the meringue recipe before piping into rosettes and baking. Quite popular at the potluck, I also had a hard time keeping Gillian's little fingers out of the cookie basket before they were served. There should not be too much color or browning on the meringues, if there is you need a lower oven temperature. Try not to bake these on a humid or rainy day, or they will just stay sticky and not really dry out. If you can't find berries right now, wait until late autumn to seek out wintergreen berries in abundance, most often under white pines.


This recipe is availble in our book, available Spring 2016.
http://www.skyhorsepublishing.com/book/?GCOI=60239108626260&