Wednesday, October 30, 2013

Mushroom Recipe - Mushroom Sausage (Vegan)

"Chicken" Sausage with caramelized ramps and garlic mustard seed mustard on bread

Living in a 2/3 vegetarian house means we often eat our fungal finds as meat substitutes in recipes. Many of our favorite wild mushrooms have incredibly meaty textures and flavors, most notably the hen of the woods (Grifola frondosa) and the chicken or sulfur shelf (Laetiporus sulphureus) mushrooms. They are both polypores, having pores on their underside instead of gills, and are often large specimens that can provide several meals from a single fruiting body. We have successfully used this recipe for both mushrooms, but I suggest using this recipe as more of a guideline and template for your own tastes and the mushrooms you may find. If the chicken mushroom is too young, it may be a little too wet for this recipe, so we use fully shelved but still tender fronds. You could also change up the spices to your tastes.


We didn't use any special equipment, just a food processor and a steamer. We used tapioca flour and wheat gluten along with sticky arborio rice to bind the sausage together. Your yield will be based on the size of the sausages you make, we usually make them about the size of Italian sausages and double or triple the recipe. The taste will improve greatly once the sausages are sliced and fried until crispy, after the initial steaming and cooling period. We have taken the sausages camping to cook up for breakfast and to a potluck, served with our wild garlic mustard seed mustard and autumn olive ketchup. The sausages also freeze nicely, so we can make lots of them when we find a big chicken flush or too many hens to eat fresh.

"Hen" Sausage with caramelized ramps and autumn olive ketchup on bread


Mushroom Sausages                               Makes about 4 sausages

10 oz. (by weight) raw hen or chicken mushroom
1 tsp sunflower oil
1/4 tsp ground coriander
1/2 tsp poultry seasoning
1/2 tsp marjoram
1/2 tsp sea salt
1 1/2 tsp granulated garlic
3 Tbsp tapioca flour
5-6 Tbsp wheat gluten powder
1/3 c. cooked arborio rice

1. Saute the mushroom with the sunflower oil over low heat for about 15 minutes. Sprinkle the coriander, poultry seasoning, marjoram and salt over the warm mushrooms and allow the mixture to cool.
2. In a food processor, add the mushroom and spice mixture, sprinkle in the tapioca flour, wheat gluten, and pulse the mixture. Add the cooked arborio rice and pulse to combine. The mixture will be crumbly, but sticky.
3. Take a piece of aluminum foil and place about one quarter of the mixture in the center. Squeeze the mixture together with your hands into the shape of a sausage. Roll up the foil around the sausage and twist the ends tightly to make a foil "casing".
4. Place the wrapped sausages in a steamer over simmering water and steam for 30 minutes. Remove from the steamer and allow the sausages to cool.
5. Remove the foil casing, the sausage should hold its shape, and chill it for a few hours to firm it up. To eat, slice and saute in a hot pan with oil until crispy.

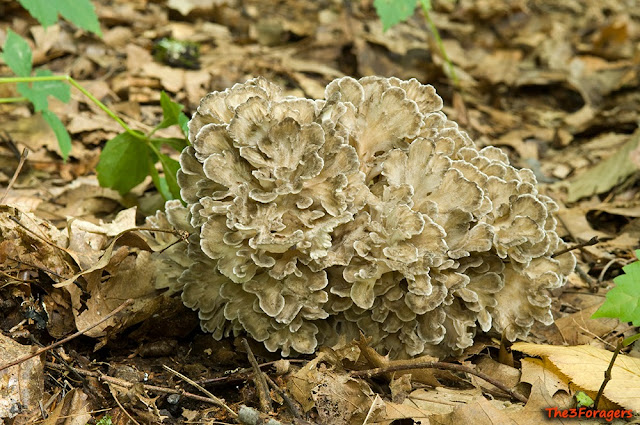
Hen of the Woods

Chicken Mushroom

Monday, October 28, 2013

Wild Cranberries Identified


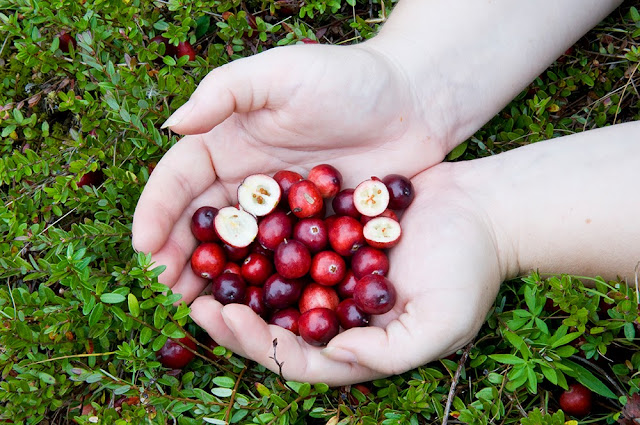
Wild large cranberries (Vaccinium macrocarpon) are native North American plants found in eastern Canada, the Northeastern New England states, the upper Midwestern states, and south to North Carolina. They grow in wet, acidic soils, often in bogs and and swampy spots, in pine barrens, and along coastal areas. Historically they were eaten by Native Americans, who called them sassamanash. Currently, cranberries are a major commercial crop for several regions, including Massachusetts and New Jersey as well as several Canadian provinces.

Our small patch grows near a boggy area in a mixed forest, in a small field area that floods seasonally in the spring with rainwater. It took us two seasons to observe the growing cycle of the wild cranberry, and we got to see the habitat in many different stages, from totally flooded to completely dry.


The first time we found the cranberry plants, I was a little surprised by their small stature. I was expecting something more like a blueberry, but these plants are very small, trailing shrubs, growing close to the ground. They create roots at their leaf nodes, and many stems are connected by underground rhizomes, creating dense mats of vine-like growth. The slightly woody stems are slender and hairless, branching rarely, and growing about 12" tall. The leaves are leathery and evergreen, 1/2" ovals with blunt tips, and are pale green on the undersides.


Flowers appear in the late spring, after some of the flood waters of spring rains have drained slowly from the acidic soil in the small field. We visited several times this spring to try to photograph the flowers, but it was very flooded in the area this year, and we had a hard time finding the small flowers, which are pollinated by bees. They have four reflexed, light pink petals with a golden-beige stamen that points downward. Many of the flowers we found were actually blooming underwater, since the water had not receded yet, and I wonder if that contributed to the smaller harvest we made this season. Gillian didn't mind exploring the flooded field, poking along the edges of the woods looking for immature berries or flowers. This field also has lots of native sweet fern (Comptonia peregrina) growing in it, and is surrounded by white pines, indicating the sandy, acidic soil composition.


The fruit starts growing through the summer and ripens in the autumn. Large wild cranberries grow from a wiry, short stem along the leaf axils. The fruit seems almost comically large in comparison to the stem of the plants, but the fruit are also incredibly light since they are hollow. One to three berries grow from each woody stem, and they are fairly easy to pick. Cranberries ripen from pink to red, and are acidic and tart tasting. Inside are several very small, light brown seeds sprinkled throughout the partially hollow interior, along with the pinkish-white flesh that is spongy and light. We pick a few buckets, rinse them off, and freeze most of the cranberries to use all year long. The size of the berries are comparable to commercial cranberries, and they can be used in all the same ways: cranberry sauce, in muffins and pancakes, dehydrated, in pies, and juiced with a bit of apples for sweetness. Cranberries are high in pectin and vitamin C, plus beta carotene and anthocyanins, and can contribute to healthy kidney and urinary tract functions. The berries can persist through frost, and we found some of last year's berries in the very early spring that survived the winter. They are crisp when fresh, and soften once they have been frozen.

Wednesday, October 16, 2013

Hen of the Woods Recipe - Maitake Mushroom Jerky


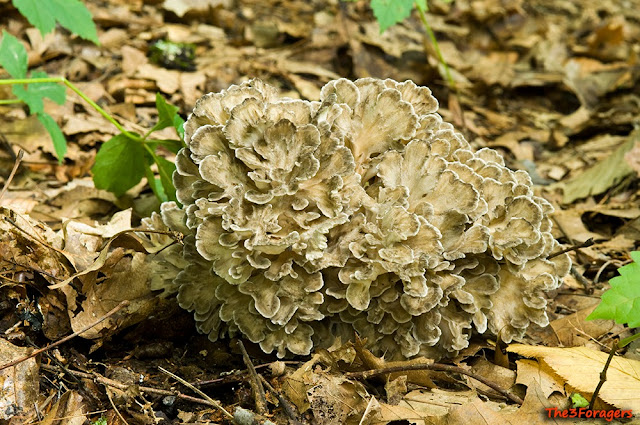
We have been finding  large amounts of hen of the woods (Grifola frondosa) this season, staring with the first find at the end of August. After an initial early flush, they started fruiting heavily in late September, and we have found more than 30 hens so far this season. We preserve our hens mostly by dehydrating the fronds to use later for soup stock, and by freezing the cores and more fronds to chop up for burgers. Robert also made lots of sausage with hens this year, using the same technique for making vegetarian sausage made from sulfur shelf mushrooms.

We needed to find something else to do with the pounds of mushrooms in the fridge, so we made some wonderful jerky. We found that this works best with slices from the core, or with very large fronds, since the pieces shrink up quite a bit in the dehydrator. We are using our Excalibur dehydrator, but an oven set on the lowest temperature will work, although the drying times will vary. We store our dried jerky in covered glass jars, but if we had a vacuum sealer, that would work well too. It doesn't last long around here, and it disappears even faster if we bring it out to a potluck event. This recipe makes a sweet/salty/spicy jerky, and the flavors can be changed to suit your tastes.


Hen of the Woods Jerky        Makes about 2 cups marinade, enough for a large hen

For the marinade:
1 c. sweet apple cider
3/4 c. low sodium soy sauce, or tamari
2-4 cloves garlic, chopped
1/2 tsp. ground white pepper
1/2 tsp. ground fennel
5 Tbsp. maple syrup
1/2-1 Tbsp. Sriracha chili-garlic sauce

1. Place all marinade ingredients in a blender, and puree for a minute. Pour the marinade in a glass or non-reactive shallow pan, preferably one with a cover.
2. Clean the hen of the woods mushroom, making 1/8" thick slices of the core and the larger fronds. All parts can be used, but they will dehydrate at different rates and shrink up quite small.
3. Boil the mushroom for 10 minutes, and drain completely. Place the boiled hen pieces in the marinade while still hot, and refrigerate for 4-6 hours.
4. Remove the pieces of hen from the marinade and drain the excess liquid off before arranging on  dehydrator trays. If drying in the oven, use wire racks placed on a sheet pan. Arrange the marinated mushroom on the trays and dehydrate at 120-130°F for 6-12 hours, until dried and leathery. The time will vary based on the thickness and sizes of the pieces, so check it often.
5. Store in an airtight jar or vacuum pack.

We often have more mushroom pieces than the dehydrator can handle at once, so we use the marinade one more time to flavor another batches, the second batch getting soaked a bit longer, until we use up all the hen. Check out these photos to see how much a very thick frond will shrink up, the top picture is raw, then the center picture is after boiling, and the third picture is after marination and dehydration.


Friday, September 20, 2013

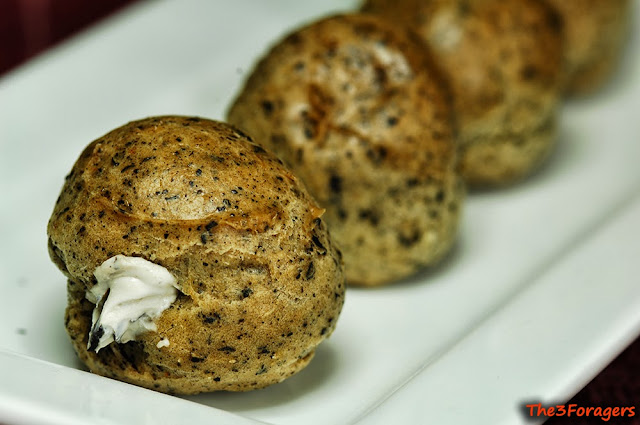
Black Trumpet Recipe - Black Trumpet Choux Bombs


We attend several mycophagy potlucks in a year and often bring a dish that is made with foraged foods, since our mushroom education is still developing and I never felt confident enough to identify and cook mushrooms for people other than ourselves. After three years of study, identification and experimenting, we finally cooked with wild mushrooms for a group, starting with a crowd-pleaser, the black trumpet.


We had about two gallons of dried black trumpets (Craterellus fallax) left over from last season that I decided to try to work with for an upcoming potluck, and had just found a few handfuls of fresh black trumpets to use as well. I thought I might make some savory pâte à choux puffs flavored with dried trumpets, and fill them with a rich black trumpet cream cheese as an appetizer.  I powdered the dried trumpets in a small coffee grinder, grinding some to a coarser grind, like cracked black pepper and some to a fine powder. I used the fresh, lightly sauteed trumpets in the cream cheese filling. I filled the puffs right before service so they wouldn't get too soft. This recipe makes about 36-48 puffs, depending on the size of the scoop, I used a 1 tsp. scoop, or you could use a piping bag to shape the puffs before baking. Making the choux puffs might sound wordy and complicated, but it is not too hard.


Black Trumpet Choux Bombs                      Makes about 36-48

1 c. flour
1 c. water
3/4 tsp salt
4 Tbsp butter
4 large eggs
1 Tbsp powdered black trumpets
2 Tbsp coarsely chopped dried black trumpets

1. Heat the oven to 425º F. Prepare a sheet pan with parchment paper.
2. In a large sautee pan, bring the water, salt and butter to a boil. Quickly stir in all the flour at once to make a paste, and cook until the mixture over medium heat until it pulls away from the sides of the pan and is dry. Transfer to the bowl of a stand mixer fitted with a paddle.
3. With the mixer running on low, add the powdered and coarsely powdered trumpets. Continue to mix for a few minutes to cool the mix.
4. Start adding the eggs, one at a time, mixing until incorporated before adding the next egg. Scrape the sides of the bowl often. You'll end up with a thick paste that can be scooped or piped with a pastry bag into small balls on the sheet pan. They will puff up a bit, so leave about 1" between each puff.
5. Bake at 425º F for 15 minutes, then reduce the heat to 350º F and bake an additional 20-25 minutes until the puffs are dry on the inside. After they are removed from the oven, poke a small hole in each to allow the steam to escape. Each puff should bake up mostly hollow, a perfect place to add a filling.

Black Trumpet Cream Cheese

8 oz. block cream cheese, softened
2 c. fresh black trumpets, chopped
1 Tbsp chopped scallions or chives
1/2 tsp salt
black pepper
1/2 tsp lemon juice

1. Quickly sautee the chopped fresh black trumpets in a little bit of olive oil, just until they are soft.
2. Mix the cooled cooked trumpets into the cream cheese along with the scallions, salt, pepper, and lemon juice. Adjust the seasonings.
3. Using a piping bag, pipe the soft cream cheese filling into the cooled puffs. You could also cut the puffs open and spoon in the filling. Serve soon after filling.


Tuesday, September 10, 2013

Chaga Recipe: Chaga Frappé Recipe


Chaga (Inonotus obliquus) is another one of the supposed superfoods and miracle-producing natural remedies that the internet just seems to love. There are hundreds of sites extolling the virtues, sharing the lore, making miraculous claims, and selling chaga in multiple forms to anyone seeking it out. We are fortunate to find it quite often on yellow and white birch in Connecticut, and I have a bucket filled with the corky conks in the pantry, just waiting to be brewed up into tea, tinctured in vodka, and experimented with. I am not going to get into the medicinal and health claims of consuming chaga, but I will share a yummy recipe that we take out to mycological society potlucks, and I can tell you we always come home with empty bottles.

This recipe is made vegan, for no other reason than we like the flavor of the coconut milk. Real dairy tends to curdle in the chaga tea, but we will top it with a bit of whipped cream for extra richness. The amounts of sweetener can be adjusted for taste, and in the early spring when we are tapping the trees, Robert will boil the decoction of chaga in maple sap and not add any sweetener at all, since the maple sap reduces into a light syrup on its own. The amount of coconut milk can also be adjusted for taste and richness, and be sure to look for preservative-free cocnut milk in the can, otherwise it will curdle too. We use roughly ground chaga for this recipe, and Robert accomplishes that by sawing the chaga with a serrated bread knife.

Chaga Frappé  makes about 7 cups

6 c. water
3 Tbsp. ground chaga
1 ¼ c. maple syrup
1 c. canned coconut milk

1. Make the chaga decoction by simmering the chaga in the water for 45 minutes. Cool for about 30 minutes and strain out the ground chaga using a coffee filter.
2. Whisk in the maple syrup.
3. In 2 batches, use a blender to blend the coconut milk into the chaga decoction for about 30 seconds. Taste and adjust sweetness or the coconut milk. You can serve it chilled or slightly warmed. Store the frappé in the refrigerator, you may need to give it a vigorous shake to homogenize it before serving.

Chaga conk on yellow birch

The ground chaga can be boiled several times. Use the same grounds and add them to 6c. of fresh water, and boil for 45 minutes again. Here is a pic of the same grounds being boiled 6 times, each time in 6 c. of fresh water.


Friday, August 30, 2013

Our First Hen of the Year

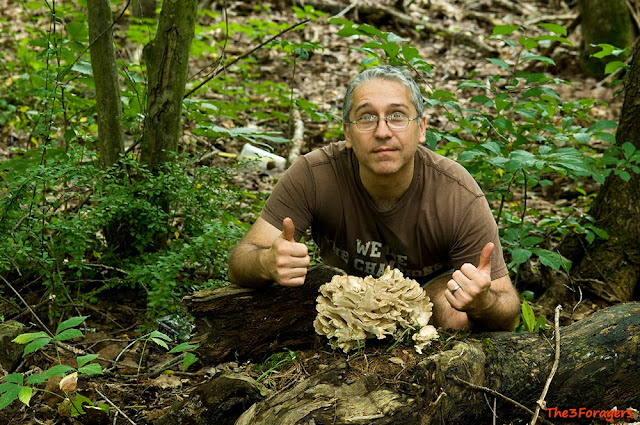
Robert and the first hen of the day

The tail end of August has been a bit chilly at night, almost autumn-like. The honey mushrooms and Pholiotas started showing up last week, traditionally fall mushrooms. The Boletes have been scarce with the cool nights, along with the black trumpets.

Our second hen, smaller but still lovely

We went out to a large mixed forest today, with hopes of finding some trumpets or honey buttons to pickle, but came home with three lovely hen-of-the-woods (Grifola frondosa), or maitake mushrooms, one of our favorite edibles.

Stroganoff sauce made with hens

Dinner was Hen Stroganoff over mashed potatoes with sliced tomatoes and cucumber salad. The dehydrator is filled with fronds and I put a container of the solid mushroom core pieces in the freezer to grind up for burgers. Robert is still smiling from his finds, and we have a fun filled and busy weekend to look forward to with the COMA Rogerson Foray on Saturday and Sunday. Hooray for early autumn!

The third hen of the day

Wednesday, August 14, 2013

Preserving Wild Harvests - Jelly and Jam


Roma food mill
Sometimes the abundance of a seasonal harvest of wild foods overwhelms us, and we are not able to eat all we gather at once. To preserve the harvest, we use several methods of keeping wild food to use at later dates. Preserving our wild harvests in jars can be accomplished in a sweet way, such as jam, jelly, and fruit in simple syrup. You'll need a few specialized items for processing and canning, like jars with proper lids and a funnel to fill the jars. I prefer my jams seed-free, so we purchased a food mill a few years ago that has a screen to remove even the seeds from a strawberry.  For canning, I just use a large stock pot to sterilize my jars in boiling water, and then to process them in the same simmering water on top of a rack so the filled jars don't rattle around.  I always use pectin when making my jellies and jams because we spend a lot of time finding, picking, cleaning, and processing wild fruits and foods, and I really want my jams to be successful  Doing a set-test by drizzling a bit of the jam or jelly onto a chilled plate and checking the "set" has saved me from some potential failures, since sometimes a longer boil than one minute is required to get my jam or jelly to set. I am able to find used jars and bands on Freecycle and at tag sales at great prices, and just have to purchase the sealing lids since they can only be used once. Jewel-toned jellies and sweet, pulpy jams make nice gifts, and I sometimes swap them at food swaps.

Jam and jellies are differentiated by the clarity of the product based on the amount of pulp used. Jam is usually cloudy and thick, filled with pulp and fruit skins for texture. Jelly tends to be clear, or colored but still translucent. Both can be used on sandwiches, stirred into breakfast oatmeal, as a layer in a yogurt parfait, or as a component in a dessert.

Wineberry jam

Wild blueberry jam on scones
Mulberry jam
Jams are made from the pureed pulp of fruit, either raw or cooked lightly to homogenize the puree. Fruit like grapes, beach plums and wild black cherries are obvious candidates for making jam, along with the plentiful berry harvests we are able to make in the summertime. We are lucky to live in southern New England, where we have hot, humid summers that are great for diverse berry harvests, even if some of those berries are invasive species. Mulberries are found in in three varieties, red (which usually ripens to black), black, and white mulberries (which will ripen to purple). We usually make jam from the red or black mulberries, since they taste better than the insipid and overly sweet white mulberries. Picking enough wild blueberries to make some jam takes a long time, since the wild berries are so much smaller than their cultivated cousins. Wineberries make a delicious, tart, deep ruby-red jam, and sometimes we are able to harvest them at the same time as the Himalayan blackberries to make a wineberry-blackberry blend. Autumn Olives can be made into either a thick, pulpy jam that tends to spoil easily, or a clear, tart jelly

Autumn olive jelly, not totally clear, but not pulpy
Commercial onion jam, wild ramps jam
We do make one savory jam from ramps. Years ago, I tasted a savory roasted garlic and onion jam made by Stonewall Kitchens. I wanted to re-create it using wild ramps bulbs in place of the onions. It goes really well with fatty, salty foods like brie cheese, roast beef, or bread and cornichons. This jam is one of the few recipes we are willing to dig ramps bulbs for, because digging the bulbs is unsustainable and kills the plant. We only dig what we need, and even then, no more than 10% of any patch.

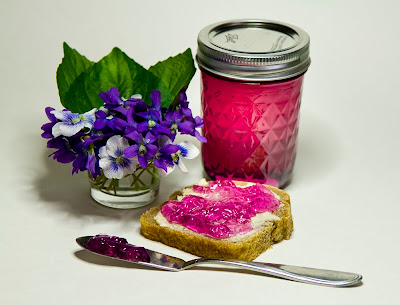
Beautiful violet jelly
Delicate black locust jelly
Dandelion jelly
Japanese knotweed jelly
Many of the clear jellies we make are flower based. The flowers are gathered and have boiling water poured over them to make an infusion. The flowers are then removed by straining the infusion through a fine-meshed jelly bag to make a clear, fragrant liquid that becomes the base of the jelly. Some of our spring ephemeral flowers that make fragrant jellies are black locust and lilac, both of which are delicately colored and scented. Dandelion flowers are time intensive to clean, but make a jelly reminiscent of honey, floral and golden. Violet jelly is dramatically colored, but only lightly floral. Japanese knotweed shoots and Rugosa rosehips can be made into a pretty and distinct jellies using the same method of making an infusion and extracting the clear juice from the wild food.


Sometimes our variety list will include about 15 different types of jams and jellies. Robert put up a shelf in the pantry to hold just some of our inventory, sized perfectly to keep the 8 oz. jars. The abundance of wild fruit and berries that we find help us to keep our pantry fully stocked through the cold winters with tastes of summer.

Tuesday, August 6, 2013

Preserving Wild Harvests - Dehydrating and Drying


Sometimes the abundance of a seasonal harvest of wild foods overwhelms us, and we are not able to eat all we gather at once. To preserve the harvest, we use several methods of keeping wild food to use at later dates. Using a basic dehydrator or just air drying are two more methods of preserving our foraged bounty to use all year long, filling the pantry with many jars of goodies. We own two dehydrators, one is an older, basic Ronco circular heat-based dryer you used to see advertised late at night, and the other is a small Excalibur, using heat and a fan to dry food. For some bulkier items, we just leave the food in a large, closed paper bag in a dark place for a few days to dry. We have successfully dried and saved roots, seeds, herbs for tisane, greens, mushrooms, and made some yummy fruit leather from our wild food harvests.

Sassafras roots
Filé powder
Dried dandelion roots
Sassafras roots can be dug during three of the four seasons here in southern New England, and they dry well to keep during the winter. We don't go out for them often, but when we come across a particularly dense stand of small saplings, we gather a large quantity for drying. Robert washes the roots and then uses a knife to shave off slices of the bark and to cut the root into small pieces. He then leaves them in a dark place to dry for a few days, and keeps the dried sassafras roots in a jar. The pieces get boiled to make a strong decoction for making beer or a sassafras drink. The leaves of the sassafras trees can be dehydrated and powdered to make the seasoning for gumbo, filé powder. Other roots we dig and dry are dandelion and chicory. The roots get washed and gently roasted in the oven to dry, then powdered in a spice grinder to use as a slightly bitter coffee substitute. We keep the dried and ground root powder in air-tight jars.


Pineapple weed

Rugosa rose hips

Wintergreen leaves

Linden tisane
An infusion of an herb in hot water is often referred to as herbal tea, but more correctly, it is a tisane. There are a few herbs we gather for hot and chilled tisanes, and they can be dried using the dehydrator, or less succulent herbs dry well in a dark paper bag. We gather the flower bracts of linden trees in spring, red clover heads and pineapple weed in summer, the red hips of Rugosa roses and leaves of bay laurel in the fall, and wintergreen leaves in early winter. The rosehips are cut in half to remove the seeds and irritating hairs, and dried in the dehydrator since they can be very fleshy and need to be dried before they start molding.

Dried bicolor boletes, black trumpets, maitake, and honey mushrooms
There are several mushrooms that we hunt that dry well, like bicolor boletes, maitake, honey mushrooms, black trumpets, and the elusive morels. I use the dehydrator for the mushrooms, often slicing them and drying them in a single layer. The black trumpets are so thin that they can be dried whole. Once dried, many of the mushrooms can be powdered and added to dishes as an umami boost like a seasoning. I usually re-hydrate the maitake in hot water and use the strongly flavored water to make a wild mushroom gravy.The dehydrated mushrooms can be added to soups and stews, or to the boiling water used for cooking grains like rice or quinoa.

Sumac berries
Garlic mustard seeds
The dehydrator works great for seeds and strongly flavored greens, like garlic mustard seeds and ramps greens. We use the dehydrator for the ramps greens, otherwise they may get moldy before they dry completely. The dried seeds and greens can be used whole, or powdered and used as spices. Pollen from cattails and pines need a quick drying session to keep them from spoiling before they are stored in the freezer. The mostly dry berry clusters of sumacs can be preserved and saved all year by drying them in a dark paper bag and storing in an air-tight container. 

Japanese knotweed fruit leather
It is possible to make fruit leather without a dehydrator, but using the machine will give better and more even results. We have used the oven set on low, and even the interior of the car on a hot summer day by leaving the tray of fruit leather on the dashboard. Fruit leathers can be made from most pulpy, sweet fruits, like berries or grapes, or even Japanese knotweed. I prefer the fruit leather seedless, so I use a food mill to remove the seeds to make a thick fruit paste which gets spread over a silicone baking mat on a sheet pan, or the special fruit leather tray for the dehydrator. Once dried, I roll up the fruit leather and wrap portions in plastic wrap or parchment paper. Keeping dried and preserved wild foods on hand allows us to use the abundance of the seasons in our cooking, mixing flavors from the seasons to create whole and balanced, well flavored meals all year.

Monday, August 5, 2013

Preserving Wild Harvests - Freezing


Sometimes the abundance of a seasonal harvest of wild foods overwhelms us, and we are not able to eat all we gather at once. Sometimes I crave the iron-y taste of nettles in December, wineberries in my oatmeal in February, or a rich, wild mushroom stew in the spring. To preserve the harvest, we use several methods of keeping wild food to use at later dates. Freezing is a method of preservation we use on many different types of wild food, from greens to berries, mushrooms, and dried flours. Several years ago we purchased a small chest freezer to keep in the basement just to fill with foraged foods, and I keep an up-to-date inventory on my fridge so I can remember what we have.

Keeping wild greens in the freezer can be accomplished in a couple of ways. In the spring when everyone has ramps fever, we head out to our favorite patches for the harvest. We rarely dig the bulb of the ramp plant, instead we harvest the green leaves by using scissors and snipping one leaf from each cluster of 2-4 leaves. Two ways we freeze them are by making the greens into a ramps pesto and freezing it in small containers, or by finely slicing the greens into strips (called a "chiffonade") and tightly packing them into containers. The ramps greens keep well this way, and I just have to pull out a bit to use them in soups, bagels, or any recipe where they will be cooked.

nettles
Leafy greens also keep well in the freezer, but they need a bit of preparation first. We freeze nettles, dandelions, and garlic mustard greens in thin bricks, that way I am able to break off a bit to use when I am cooking. Before we freeze the greens, we blanch then for about 15 seconds in boiling water, then shock the greens in ice water. This stops the cooking process and allows the greens to keep their color and nutritional content, while removing most of the volume of the raw greens. After the greens are cooled, I wring out the excess water by squeezing them in handfuls, give the greens a quick and coarse chop, then tightly pack a thin layer of greens in a freezer-safe gallon plastic bag. I try to freeze the bags flat on their sides, and once they are frozen, they are easily stacked or placed upright.
July abundance of wineberries and wild blueberries
cranberries, cleaned and ready for freezing
Berries also freeze well, with a little planning. I try to Individually Quick Freeze them, or use the IQF method. We keep wineberries, blackberries, cranberries, blueberries, and non-traditional berries like spicebush berries in the freezer. To prepare berries for the freezer, I generally give them a quick wash and allow them to air-dry. I then spread them on a single layer on a parchment paper-lined sheet pan, and put the pan in the freezer. As long as they are not wet, they will freeze individually and can then be scooped into quart-sized freezer bags. I try to remove as much air as possible from the bag to prevent ice crystals from forming, and use the berries before the next season comes around. While the berries will be a little soft upon thawing, they can still be used successfully in oatmeal, pancakes, juiced, and in recipes like muffins and pancakes.

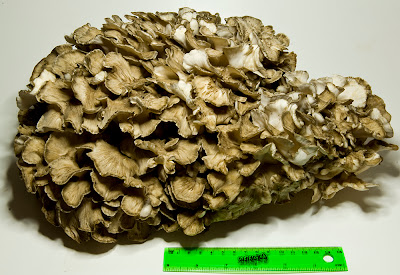
A large maitake mushroom
It is not often we are able to find so many mushrooms that we need to freeze them, but the 3 of us can only eat so much of the larger specimens at a time. Some maitake can weigh up to 30 pounds, and often we find more than one, so freezing is one way to preserve our harvest. We also freeze honey mushrooms and sulphur shelf mushrooms. To freeze mushrooms, you can either slice and pack them into containers raw, or cook them first and freeze. I generally pack them raw, as the freezing and thawing process makes the mushroom release a lot of its liquid, which I can then reduce and concentrate while cooking with the fungi. I use the frozen mushrooms in soups and in pilafs, and stuff bread with the cooked mushrooms. We also made large amounts of ravioli and burger patties with the fresh mushrooms, and froze them in plastic bags.

Acorn flour, stored in glass jars in the freezer, will last for a couple years
Some of the more unusual things we keep in the freezer are acorn flour (to keep it from going rancid), nuts like hickory and black walnut, pine and cattail pollen, dried and powdered nettles, and the male portion of cattail flowers, removed from the stem. I also keep a batch of Japanese knotweed muffins and berry juice, usually surplus from jam making. There is a small container of garlic mustard seeds in the freezer as well, to use in mustard making and to sprinkle on breads. Having our abundant harvests of wild food on hand all year in the freezer enhances our meals, and reduces our grocery bill at the same time!